How to Change the Native VLAN on a Cisco Switch
VLANs (Virtual Local Area Networks) help segment traffic, improve network performance, and enhance networking security. One of the most essential VLAN configurations on Cisco switches is the native VLAN, which is used to carry untagged traffic on trunk links. Changing the native VLAN can optimize network operations and maintain security. This guide will walk you through the steps to change the native VLAN on a Cisco switch, explain why you might need to make this change and offer best practices to ensure your network runs smoothly.
What is the Native VLAN on a Cisco Switch?
Before diving into the steps to change the native VLAN, it’s essential to understand what the native VLAN is. On a Cisco switch, the native VLAN is the VLAN associated with untagged Ethernet frames on a trunk link. Trunk links, used to carry multiple VLANs between switches, typically tag Ethernet frames with a VLAN identifier (VID) so that switches can determine which VLAN the frame belongs to. However, untagged traffic that doesn’t carry a VLAN tag will be assigned to the native VLAN.
ELI5
Imagine you're playing with a set of toy cars, and each car belongs to a different parking space (VLAN). Now, some cars don’t have stickers on them to show which parking space they belong to, so they get sent to a special parking space called the "native VLAN." Changing the native VLAN is like moving that special parking space to a different spot, so the cars without stickers go there instead. This helps keep everything organized and makes sure no cars get lost!
Why Change the Native VLAN?
Changing the native VLAN can be beneficial for several reasons:
- Security: The native VLAN is often a target for VLAN hopping attacks. By changing the native VLAN to something other than VLAN 1, you can reduce the risk of unauthorized access.
- Network Management: If you have an existing VLAN numbering scheme, changing the native VLAN to match this scheme can improve network organization and management.
- Compliance: Certain network security policies or industry best practices may recommend using a different native VLAN.
How to Change the Native VLAN on a Cisco Switch
Changing the native VLAN on a Cisco switch is straightforward but requires careful execution to ensure no disruption to your network. Here’s a step-by-step guide:
Step 1: Access the Cisco Switch
To configure a Cisco switch, you need to connect to it through a console cable, SSH, or Telnet. Ensure that you have the necessary administrative privileges to make changes to the switch configuration.
- Connect to the switch using your preferred method (console, SSH, or Telnet).
Enter global configuration mode by typing:
configure terminal
Enter privileged EXEC mode by typing:
enable
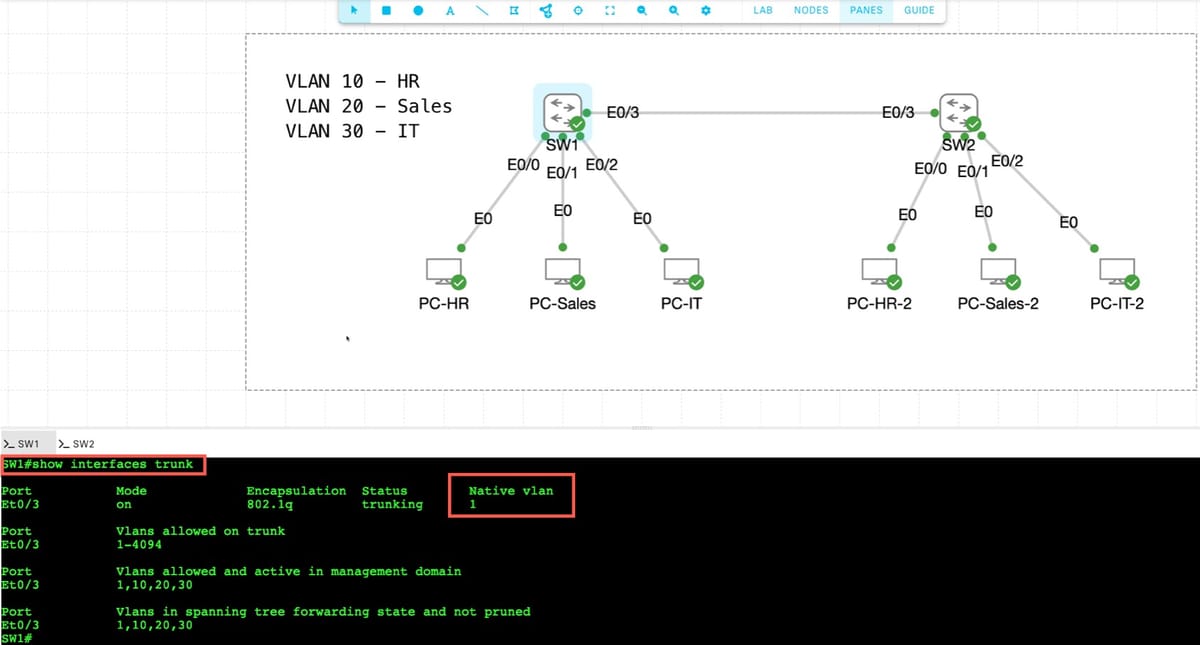
Step 2: Identify the Trunk Ports
Next, identify the trunk ports on the switch. These are the ports that carry traffic for multiple VLANs and will be configured with a new native VLAN.
- This will display the trunking information for all interfaces. Note which ports are configured as trunk ports.
To view the current trunk ports, type the following command:
show interfaces trunk
Step 3: Change the Native VLAN
Now, you can change the native VLAN for your trunk ports. Let’s say you want to change the native VLAN to VLAN 10. To do this:
Exit interface configuration mode by typing:
exit
Set the native VLAN for the trunk port by typing:
switchport trunk native vlan 10
Enter the interface configuration mode for the trunk port. For example, if you are configuring interface GigabitEthernet 0/1, type:
interface GigabitEthernet0/1
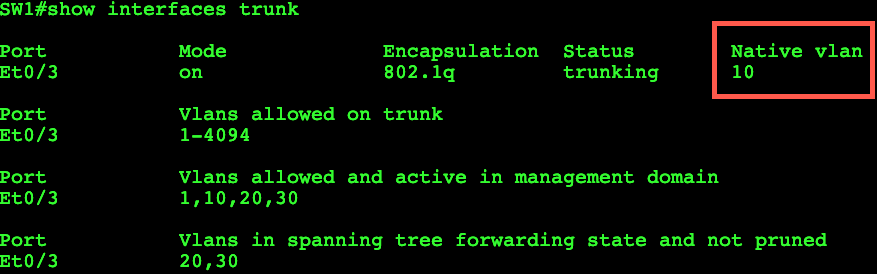
Step 4: Verify the Configuration
After configuring the native VLAN, verify that the changes have been applied successfully. To do this:
- Verify that the correct native VLAN is listed for the trunk port.
Use the following command to display the trunking information again:
show interfaces trunk
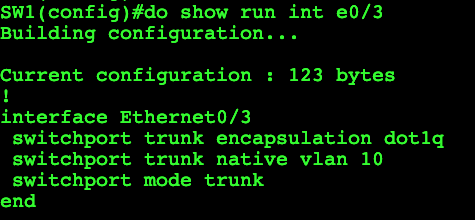
Additionally, you can use the show running-config command to verify that the native VLAN is configured correctly on the switch.
Step 5: Save the Configuration
To ensure that the changes persist after a reboot, save the configuration:
write memory
or
copy running-config startup-config
Best Practices for Configuring the Native VLAN
While changing the native VLAN can provide security and organizational benefits, it’s important to follow best practices:
- Avoid VLAN 1: VLAN 1 is the default native VLAN on most Cisco switches, and using it can expose your network to security risks. Choose a different VLAN for the native VLAN, such as VLAN 99 or another VLAN that aligns with your network’s numbering scheme.
- Consistency Across Switches: When configuring the native VLAN on trunk ports, ensure that the same native VLAN is configured on both ends of the trunk link. Mismatched native VLANs can result in communication issues.
- Isolate Management Traffic: Consider using a dedicated VLAN for management traffic (e.g., VLAN 99) and set this as the native VLAN to further secure your network’s management access.
Troubleshooting Tips
If you experience issues after changing the native VLAN, consider the following troubleshooting tips:
- Check VLAN Configuration: Ensure the VLAN you are setting as the native VLAN exists on the switch. If not, create the VLAN before configuring it as the native VLAN.
- Verify Trunking: Confirm that trunking is enabled on the ports you are configuring. Use the
show interfaces trunkcommand to verify the trunking status. - Ensure End-to-End Compatibility: Verify that the native VLAN change is consistent on both sides of the trunk link. If one side is configured with a different native VLAN, communication issues may occur.
- Check for Untagged Traffic: Remember that only untagged traffic will be sent to the native VLAN. If you have tagged traffic that should go to a different VLAN, make sure the configuration is correct.
Conclusion
Changing the native VLAN on a Cisco switch is a simple but important configuration task that can enhance network security and management. By following the steps outlined in this guide and adhering to best practices, you can ensure that your network is optimized for performance and security. Always remember to verify your changes, keep the native VLAN consistent across trunk links, and avoid using VLAN 1 to minimize security risks.
If you found this guide helpful, feel free to leave a comment or share it with your network. For more networking tips and tutorials, subscribe to our newsletter!