How to Enable SSH on Cisco Routers and Switches

SSH (Secure Shell) provides secure remote access to Cisco networking devices. This guide shows you the steps to enable SSH on Cisco routers and switches.
Prerequisites
- A Cisco router or switch with IOS software
- Console access to the device
- Administrative privileges
- RSA key pair for encryption
Step-by-Step Configuration
1. Set the Hostname and Domain Name
Router> enable
Router# configure terminal
Router(config)# hostname R1
R1(config)# ip domain name example.com
2. Generate RSA Key Pair
R1(config)# crypto key generate rsa
How many bits in the modulus [512]: 2048
For optimal security, Cisco recommends using a key size of 2048 bits, which provides a good balance between security and performance. While larger key sizes offer increased security, they require more processing power and time to generate. Avoid using keys of 1024 bits or smaller, as they no longer meet current security standards. For detailed information about encryption standards, see the Cisco Next Generation Encryption guide, which provides comprehensive recommendations for cryptographic algorithms and key lengths.
3. Create a Local User Account
R1(config)# username admin privilege 15 secret YourPassword1234. Configure VTY Lines
R1(config)# line vty 0 4
R1(config-line)# transport input ssh
R1(config-line)# login local
R1(config-line)# exit
5. Enable SSH Version 2
R1(config)# ip ssh version 26. Verify SSH Configuration
R1# show ip ssh
R1# show ssh
Security Best Practices
1. Use Strong Passwords
- Create complex passwords
- Change default credentials
2. Limit Access
- Restrict SSH access to specific IP addresses
- Use ACLs to control traffic
3. Regular Updates
- Keep IOS software current
- Apply security patches
Troubleshooting Tips
1. Check SSH Status
- Verify SSH service is running
- Confirm version 2 is enabled
2. Common Issues
- RSA key generation errors
- VTY line configuration problems
- Authentication failures
Example ACL Configuration
R1(config)# access-list 1 permit 192.168.1.0 0.0.0.255
R1(config)# line vty 0 4
R1(config-line)# access-class 1 in
Testing the Connection
- Use an SSH client (like PuTTY or OpenSSH)
- Connect using the device’s IP address
- Enter username and password
- Verify successful login
Remember to save your configuration:
R1# write memoryHow to Connect Using PuTTY
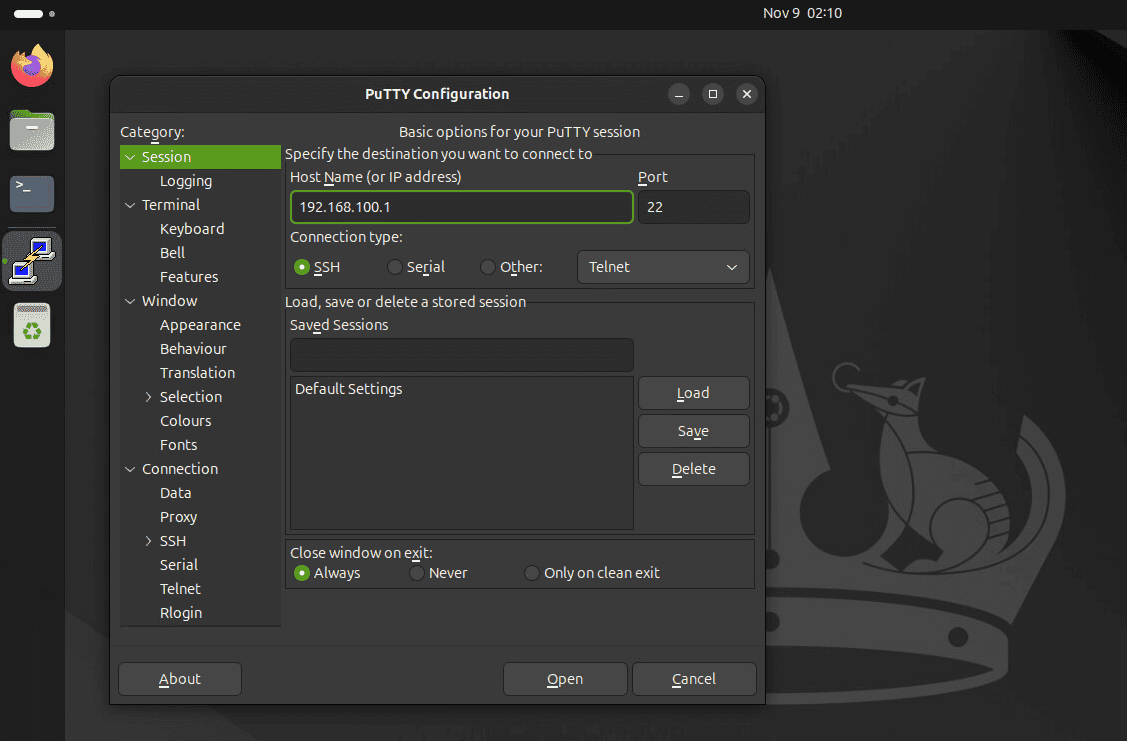
Follow these steps to connect to your Cisco device using PuTTY:
1. Configure Basic Connection Settings
- Open PuTTY
- In the “Host Name (or IP address)” field, enter your router’s IP address
- Ensure the “Port” field is set to 22 (default SSH port)
- Under “Connection type,” select SSH

2. Configure SSH Settings (Optional)
- In the left menu, go to Connection > SSH
- Set “Preferred SSH protocol version” to 2
- Enable “Enable compression”
3. Save Your Session (Optional)
- Return to the Session category in the left menu
- Enter a name in the “Saved Sessions” field
- Click “Save” to store these settings for future use
4. Connect to the Router
- Click “Open” to start the connection
- Click “Yes” if you receive a security alert about the server’s host key
- Enter your username when prompted
- Enter your password when prompted
Troubleshooting PuTTY Connection Issues
- Verify the router’s IP address is correct
- Confirm SSH is enabled on the router
- Check if any firewalls are blocking port 22
- Ensure you have network connectivity to the router
- Verify your username and password are correct
How to Connect Using Ubuntu Linux
Connecting to your Cisco device from Ubuntu Linux is straightforward using the built-in OpenSSH client. Here’s how to do it:
Basic SSH Connection
- Open Terminal
- Press Ctrl + Alt + T, or
- Search for “Terminal” in the Applications menu
- Use the SSH Command
ssh username@router-ip-addressExample:
ssh admin@192.168.1.1
Once connected, you’ll see the router’s command prompt, indicating a successful SSH session. When finished, remember to log out properly by typing ‘exit’ at the command prompt.

This completes the basic SSH setup on your Cisco device. Regular testing and monitoring help maintain secure remote access to your network infrastructure.


