How to Import Files to Cisco Router

Introduction
Transferring files to a Cisco router can be a daunting task, especially with the evolving networking technologies in 2024. If you’ve ever struggled with upgrading your Cisco IOS or managing configurations due to file transfer issues, you’re not alone. The good news? Importing files to a Cisco router has become more streamlined than ever.
In today’s fast-paced networking environment, keeping your routers up-to-date is crucial for security and performance. This guide is designed for network administrators and IT professionals who want a clear, step-by-step tutorial on importing files to a Cisco router.
By the end of this guide, you’ll learn:
- The current methods for transferring files to Cisco routers
- How to set up a TFTP server for file transfers
- Best practices to avoid common pitfalls
- Troubleshooting tips for common issues
Current Industry Context
In 2024, network infrastructures have become more complex, and the need for efficient file transfers to devices like Cisco routers is more critical than ever. With the rise of cloud-managed networks and increased security threats, staying updated with the latest IOS versions is essential.
Basic Concepts Explained Simply
What is a TFTP Server?
A Trivial File Transfer Protocol (TFTP) server is a simple protocol that allows you to transfer files to and from network devices. It’s commonly used for transferring configurations and IOS images to Cisco routers.
Why Use TFTP Over Other Protocols?
TFTP is lightweight and easy to set up, making it ideal for quick file transfers within a secure network. While protocols like FTP and SFTP offer more features and security, TFTP’s simplicity makes it a preferred choice for internal network operations.
Step-by-Step Tutorial
Note: Ensure you have administrative access to both your computer and the Cisco router.
Step 1: Set Up a TFTP Server
Windows Users:
- Download a TFTP Server Software There are several free TFTP server applications available. For this guide, we’ll use Tftpd64.
- Download from the official website: Tftpd64
- Install and Configure Tftpd64
- Run the installer and follow the prompts.
- Once installed, open Tftpd64.
- Set the Current Directory to the folder where your files are stored. Expected Outcome: Your TFTP server is now running and ready to serve files to your Cisco router.
Step 2: Connect to the Cisco Router
- Establish a Console Connection
- Use a console cable to connect your computer to the router.
- Open a terminal emulator (e.g., PuTTY or HyperTerminal).
- Access Privileged EXEC Mode
   Router> enable
   Router#
Step 3: Verify Network Connectivity
Ensure the router can reach your TFTP server.
Router# ping 192.168.1.10Replace 192.168.1.10 with your TFTP server’s IP address.
Expected Outcome:
You should receive replies confirming connectivity.
Step 4: Import the File
Use the copy command to transfer the file.
Router# copy tftp flashYou’ll be prompted for details:
- Address or name of remote host?
192.168.1.10 - Source filename?
yourfile.bin - Destination filename? Press Enter to keep the same name.
Expected Outcome:
The router will begin transferring the file. You should see an output like:
Accessing tftp://192.168.1.10/yourfile.bin...
Loading yourfile.bin from 192.168.1.10 (via FastEthernet0/0): !!!!!!!!!!!!!!!!!!!!!!!!!!!
[OK - 12345678 bytes]
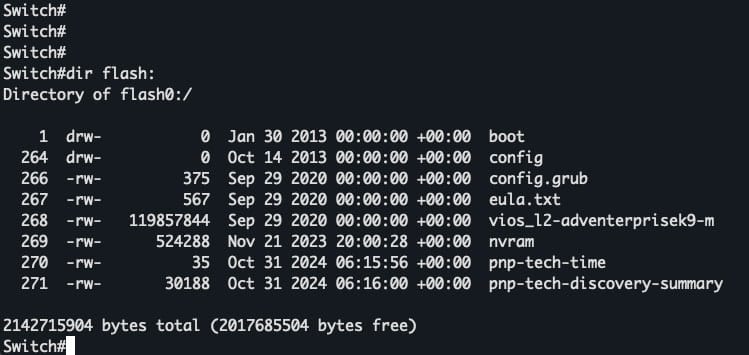
Step 5: Verify the File
Confirm that the file has been successfully imported.
Router# dir flash:Look for yourfile.bin in the output list.
Expected Outcome:
The file appears in the flash memory directory.
Real-World Implementation
Case Study: Upgrading Cisco IOS
John, a network administrator at XYZ Corp, needed to upgrade the IOS on multiple Cisco routers to patch a security vulnerability discovered in early 2024. Using the steps above, he efficiently transferred the new IOS images to each router using a TFTP server, minimizing downtime and ensuring network security.
Common Challenges and Solutions
- Issue: TFTP transfer times out. Solution: Check firewall settings on your computer to ensure TFTP traffic is allowed.
- Issue: Router cannot reach the TFTP server. Solution: Verify IP configurations and ensure both devices are on the same network or have proper routing.
Best Practices and Expert Tips
- Use SFTP for Enhanced Security: While TFTP is convenient, consider using Secure FTP (SFTP) for transferring sensitive files.
- Backup Configurations Before Changes: Always back up the current configuration before importing new files.
Router# copy running-config startup-config- Check Available Flash Memory: Ensure the router has enough flash memory for the new file.
Router# show flash:Common Mistakes to Avoid
- Not verifying network connectivity before transfer.
- Forgetting to disable firewalls that block TFTP traffic.
- Overwriting important files without backups.
Troubleshooting Guide
Common Issues
- Error:
%Error opening tftp://... (Timed out)Solution: Ensure the TFTP server is running and accessible. Disable any firewalls blocking TFTP traffic. - Error:
Not enough space on deviceSolution: Delete unnecessary files from the router’s flash memory or upgrade the memory.
Practical Value
Actionable Takeaways
- Set up a TFTP server for efficient file transfers.
- Always verify connectivity before initiating transfers.
- Backup configurations to prevent data loss.
Quick Reference
- Copy Command Syntax:
copy tftp flash- Verify File Transfer:
dir flash:FAQ
- Can I use FTP instead of TFTP? Yes, Cisco routers support FTP. Use
copy ftp flashand ensure your FTP server is configured. - Is it safe to use TFTP over the internet? No, TFTP is not secure and should only be used within a trusted network.
- What if I don’t have enough flash memory? You may need to delete old files or upgrade your router’s flash memory.
Conclusion
Importing files to a Cisco router doesn’t have to be a complex task. By following this guide, you can confidently manage your router’s configurations and updates, ensuring a secure and efficient network in 2024.


